Cozy Hot Cocoa Layered Cake with Marshmallow Buttercream

Serves 12 Slices (approximately)

Total Time 2 Hours

Ingredients

  • Hot Cocoa Cake
    • 1 3/4 cups cake flour (substitute all-purpose flour)
    • 2 / 3 cup cocoa powder
    • 1 / 3 cup hot cocoa mix, no marshmallows
    • 2 teaspoons baking powder
    • 1 / 4 teaspoon baking soda
    • 1 teaspoon salt
    • 3 / 4 cup unsalted butter, room temperature
    • 1 1/2 cups granulated sugar
    • 3 eggs, room temperature
    • 1 / 2 cup milk, room temperature
    • 1 / 2 cup sour cream, room temperature
  • Buttercream (Marshmallow and Hot Cocoa)
    • 2 cups unsalted butter (soft, but slightly cooler than room temperature)
    • 6 cups powdered sugar
    • 1 / 4 cup heavy cream (substitute with milk)
    • pinch of salt
    • 1 cup marshmallow creme (marshmallow fluff)
    • 1 / 4 cup hot cocoa mix, no marshmallows
  • For Decorating (optional)
    • mini chocolate chips
    • sprinkles of choice

Preparation

Hot Cocoa Cake

Preheat oven to 350 degrees. Trace and cut out parchment paper to line the bottoms of two 8 – inch cake pans. Set aside.

In a stand mixer or large mixing bowl, cream your butter for 2 minutes until light in color and fluffy. Add granulated sugar and mix for approximately 3-4 minutes or until creamy. Add in eggs, one at a time, incorporating after each addition. Set aside.

In a separate mixing bowl, whisk together flour, cocoa powder, hot cocoa mix, baking powder, baking soda, and salt.

Whisk together your milk and sour cream. I typically whisk this mixture together in a liquid measuring cup so it is easier to pour in the following steps.

Starting with your dry ingredient mixture, begin alternating additions of dry ingredients and the milk mixture to the large mixing bowl or stand mixer. You should begin by adding 1/3 of your dry ingredient mixture and follow by adding 1/2 of your milk mixture. Repeat these additions, mixing after each until just incorporated. Avoid over mixing as this can cause a dry cake.

Divide the cake batter equally between each of your cake pans. Place in the oven and bake for 25-35 minutes (a dark cake pan will requirer the shorter cook time while a lighter colored cake pan will require the longer cook time) or until an inserted toothpick comes out clean.

Remove the cakes from the cake pans and place on a wire rack to let cool completely.

Buttercream (Marshmallow and Hot Cocoa)

In a stand mixer or a large mixing bowl, beat butter for approximately 2 minutes or until light and fluffy. Gradually begin adding in the powdered sugar and continue mixing. Add a pinch of salt. Stream in half of your heavy cream (or milk). If the buttercream appears to thick to spread, add in the remaining half of the heavy cream (or milk). You will use this buttercream as the base recipe for the following steps.

Divide the buttercream into two separate bowls, one bowl with 1/3 of your frosting and the other bowl with the remaining 2/3 of frosting.

To the bowl with 1/3 of your frosting, add in 1 cup of marshmallow creme. Stir to combine completely, or use the mixer to incorporate. This marshmallow buttercream will be used to fill the middle layer of your cake and for decorating the top of the cake.

To the bowl with 2/3 of your frosting, add in 1/4 cup (or approximately 1 standard size packet) of hot cocoa mix, no marshmallows. Stir to combine completely. If the buttercream is too thick to spread, stream in an additional tablespoon of heavy cream or milk.

Cake Assembly

Level your cakes with a serrated knife to create flat, even layers that will be easy to stack.

To a cake stand or large plate, spread a thin layer of the hot cocoa buttercream. This will help keep the cake in place while you frost and decorate it.

Place one of the cake layers onto the stand. Spread a 1/2 inch thick layer of marshmallow buttercream evenly across the cake.

Place your other cake layer on top, flipping this cake layer upside down so that the top of your cake has a flat bottom. Press down gently.

Cover the entire cake with a layer of the hot cocoa buttercream. Smooth out the sides as much as possible. This will be your crumb coat. Chill the cake for 10-15 minutes before using the remaining buttercream to completely cover and frost the cake.

Add remaining marshmallow buttercream to a pastry bag and pipe designs around the top of the cake. Add mini chocolate chips and sprinkles to decorate with as desired.

This cake will serve approximately twelve people and is best enjoyed the day it is made. Store in an airtight container if leftovers remain.

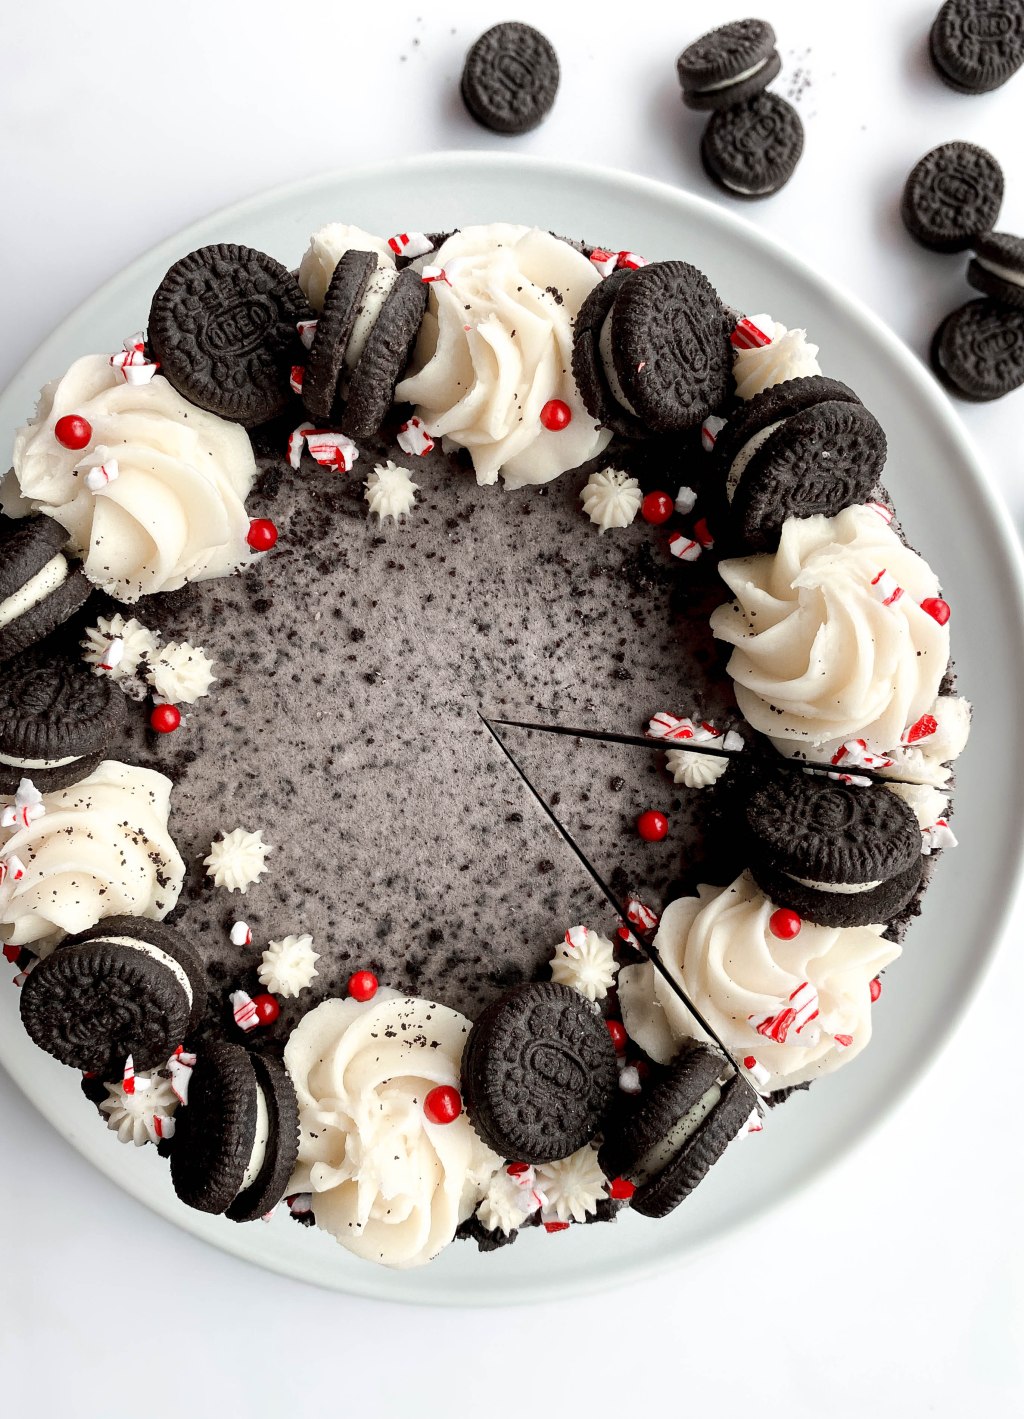
Holiday Oreo and Peppermint Layered Cake with Oreo Buttercream

Serves 12 Slices (Approximately)

Total Time 2+ Hours

Ingredients

  • Vanilla Cake with Oreo Pieces
    • 2 1/2 cups cake flour (substitute all-purpose flour)
    • 2 teaspoons baking powder
    • 1 / 4 teaspoon baking soda
    • 1 / 2 teaspoon salt
    • 3 / 4 cup unsalted butter, room temperature
    • 1 1/2 cups granulated sugar
    • 3 eggs, room temperature
    • 2 1/2 teaspoons vanilla extract
    • 1 / 2 cup milk, room temperature
    • 1 / 2 cup sour cream, room temperature
    • 12 oreo cookies (standard size)
  • Peppermint Oreo Filling
    • 36 oreos (standard size)
    • 8 oz cream cheese
    • 1 / 4 teaspoon peppermint extract
    • pinch of salt
  • Oreo Buttercream
    • 12 oreo cookies (standard size)
    • 1 1/2 cups unsalted butter (soft, but slightly cooler than room temperature)
    • 5 cups powdered sugar
    • 1 1/2 teaspoons vanilla extract
    • 1 / 4 cup heavy cream (substitute with milk)
    • pinch of salt
  • For Decorating (Optional)
    • Mini oreo cookies
    • Candy cane pieces
    • Sprinkles of choice

Preparation

Oreo Cake

Preheat oven to 350 degrees. Trace and cut out parchment paper to line the bottoms of two 8 – inch cake pans. Set aside.

In a large mixing bowl, use a mixer to cream butter for 2 minutes until light in color and fluffy. Add granulated sugar and mix for approximately 3-4 minutes or until creamy. Add in eggs, one at a time, incorporating after each addition. Add in vanilla extract. Set aside.

In a medium mixing bowl, whisk together flour, baking powder, baking soda and salt.

Whisk together your milk and sour cream. I typically whisk this mixture together in a liquid measuring cup so it is easier to pour in the following steps.

Starting with your dry ingredient mixture, begin alternating additions of dry ingredients and the milk mixture to the large mixing bowl. You should begin by adding 1/3 of your dry ingredient mixture and follow by adding 1/2 of your milk mixture. Repeat these additions, mixing after each until just incorporated. Avoid over mixing as this can cause a dry cake.

Use a sharp knife to chop 12 oreos into smaller pieces. Do not finely crush the oreos. Carefully mix or fold the oreo pieces into your batter until just incorporated.

Divide the cake batter equally between each of your cake pans. Place in the oven and bake for 25-35 minutes (a dark cake pan will requirer the shorter cook time while a lighter colored cake pan will require the longer cook time) or until an inserted toothpick comes out clean.

Remove the cakes from the cake pans and place on a wire rack to let cool completely.

Peppermint Oreo Filling

While the cakes are cooling, prepare the filling. Add 36 oreos to a high speed blender or food processor. Pulse until the oreos resemble a fine crumb and no large pieces remain. Add in the cream cheese, peppermint extract, a pinch of salt and pulse/blend again until fully incorporated.

In an additional cake pan lined with foil or plastic wrap, spread the oreo filling in an even layer. Place in the refrigerator to chill while you prepare the frosting.

Oreo Buttercream

Remove the filling from 12 oreos. Set the filling aside for later use.

Add the 12 oreo cookies to a food processor or high speed blender, and pulse/blend until no large pieces remain and the oreos are fine crumbs. It is important to have fine oreo crumbs to achieve a smooth frosting that will be easier to frost with.

In a stand mixer or a large mixing bowl, beat butter for approximately 2 minutes or until light and fluffy. Gradually begin adding in the powdered sugar and continue mixing. Add in the vanilla extract, a pinch of salt, and the reserved oreo cream filling. Stream in half of your heavy cream (or milk). Add in your finely crushed oreos and mix. If the buttercream appears to thick to spread, add in the remaining half of the heavy cream (or milk).

Cake Assembly

Level your cooled cakes with a serrated knife.

To a cake stand or large plate, spread a thin layer of buttercream frosting.

Place one of the cake layers onto the stand. Spread a thin layer of buttercream frosting. Remove the oreo filling layer from the refrigerator and carefully take the layer out of the pan. Place this layer on your cake. Lightly press down. Spread another thin layer of buttercream frosting.

Place your other cake layer on top, flipping this cake layer upside down so that the top of your cake has a flat bottom. Press down gently.

Cover the entire cake with a layer of buttercream frosting. Smooth out the sides as much as possible. This will be your crumb coat. Chill the cake for 15-20 minutes before using the remaining buttercream to completely cover and frost the cake.

Add oreo crumbs to the top of the cake around the top of the cake (as shown in picture). Using remaining buttercream, add to a pastry bag and pipe a design around the top of the cake. Add candy cane pieces and sprinkles as desired.

This cake will serve approximately twelve people and is best enjoyed the day it is made. Store in an airtight container if leftovers remain.

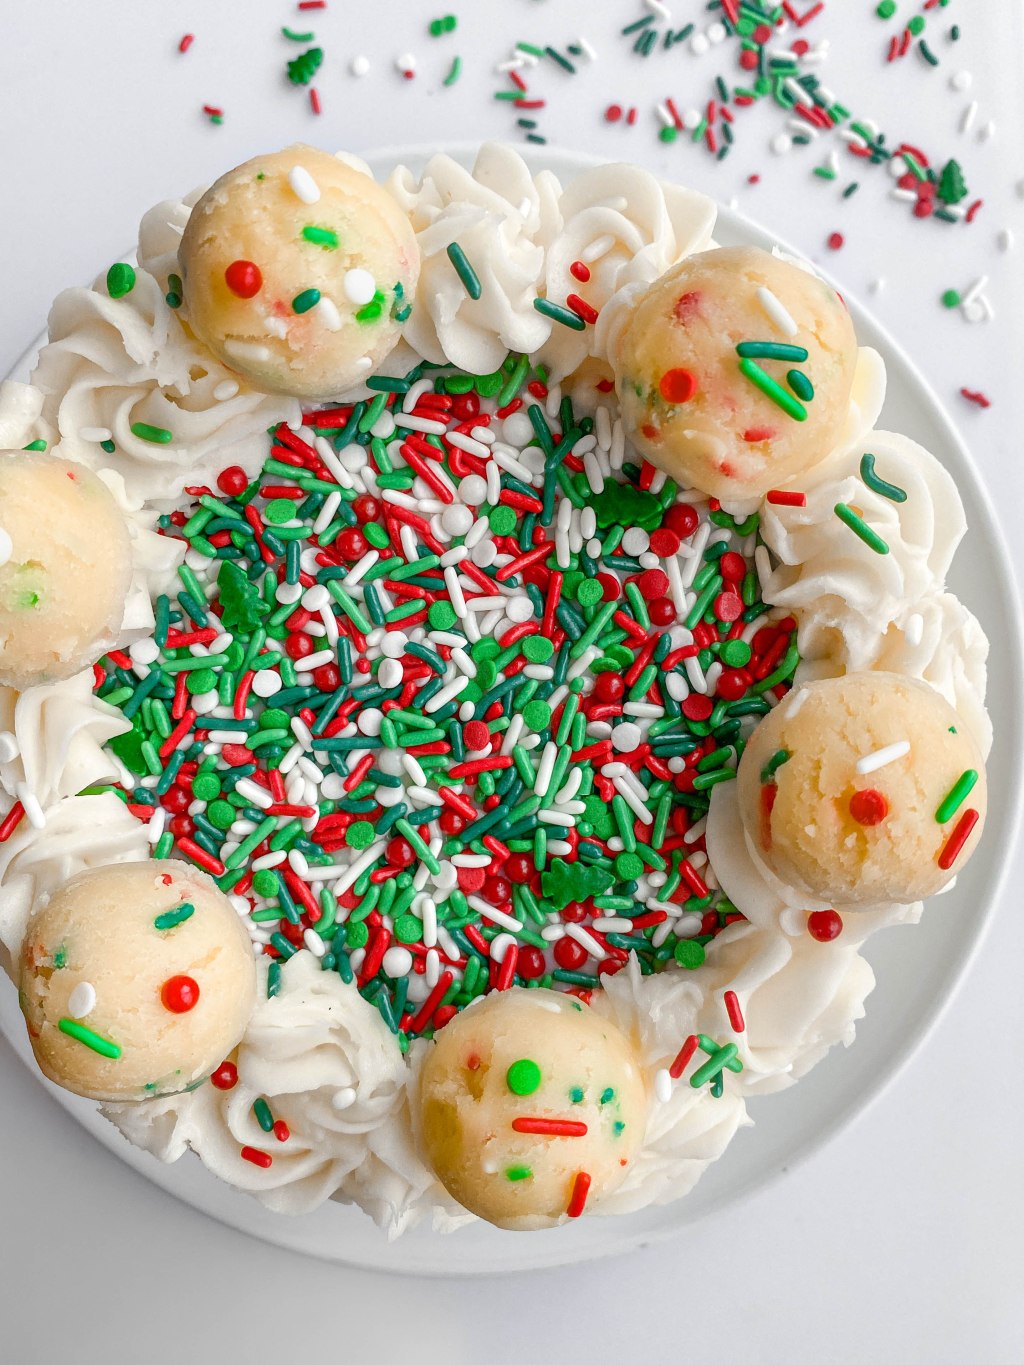
Holiday Sugar Cookie Dough Layered Cake with Vanilla Buttercream

Serves 12 Slices (Approximately)

Total Time 2 Hours

Ingredients

  • Holiday Sprinkle Cake
    • 2 1/2 cups cake flour (substitute all-purpose)
    • 2 teaspoons baking powder
    • 1 / 4 teaspoon baking soda
    • 1 / 2 teaspoon salt
    • 3 / 4 cup unsalted butter, room temperature
    • 1 1/2 cups granulated sugar
    • 3 eggs, room temperature
    • 2 1/2 teaspoons vanilla extract
    • 1 / 2 cup milk, room temperature
    • 1 / 2 cup sour cream, room temperature
    • 1 cup sprinkles of choice
  • Sugar Cookie Dough Filling
    • 2 cups all-purpose flour
    • 1 / 2 teaspoon salt
    • 1 cup unsalted butter, room temperature
    • 2 / 3 cup granulated sugar
    • 1 1/2 teaspoons vanilla extract
    • 2 tablespoons milk
    • 1 / 4 cup sprinkles of choice
  • Vanilla Buttercream
    • 1 1/2 cups unsalted butter (soft, but slightly cooler than room temperature)
    • 5 cups powdered sugar
    • 1 1/2 teaspoons vanilla extract
    • 1 / 4 cup heavy cream (substitute with milk)
    • pinch of salt
  • For Decorating
    • sprinkles of choice

Preparation

Holiday Sprinkle Cake

Preheat oven to 350 degrees. Trace and cut out parchment paper to line the bottoms of two 8 – inch cake pans. Set aside.

In a stand mixer or large mixing bowl, cream your butter for 2 minutes until light in color and fluffy. Add granulated sugar and mix for approximately 3-4 minutes or until creamy. Add in eggs, one at a time, incorporating after each addition. Add in vanilla extract. Set aside.

In a medium mixing bowl, whisk together cake flour, baking powder, baking soda, and salt.

Whisk together your milk and sour cream. I typically whisk this mixture together in a liquid measuring cup so it is easier to pour in the following steps.

Starting with your dry ingredient mixture, begin alternating additions of dry ingredients and the milk mixture to the large mixing bowl. You should begin by adding 1/3 of your dry ingredient mixture and follow by adding 1/2 of your milk mixture. Repeat these additions, mixing after each until just incorporated. Avoid over mixing as this can cause a dry cake.

Add in your holiday sprinkles of choice and mix until just combined.

Divide the cake batter equally between each of your cake pans. Place in the oven and bake for 25-35 minutes (a dark cake pan will requirer the shorter cook time while a lighter colored cake pan will require the longer cook time) or until an inserted toothpick comes out clean.

Remove the cakes from the cake pans and place on a wire rack to let cool completely.

Sugar Cookie Dough Filling

Spread the flour on a baking sheet in an even layer and place in the oven for 5 minutes at 350 degrees. This ensures that the raw flour will be safe to consume. Let cool completely before using.

In a medium sized mixing bowl, use a mixer to cream the butter with the granulated sugar until it is light in color and creamy. Add in vanilla extract and mix again.

In a separate bowl, whisk together your flour and salt. Add to your creamed butter/sugar mixture. Mix to combine.

Pour in milk and stir to combine. Fold in sprinkles of choice.

Line a third 8 – inch cake pan with plastic wrap or parchment paper. It should be thick, but as evenly as possible, spread the filling into a layer across the entire pan. Place this in the refrigerator to chill while you wait for the cake layers to cool and while you begin working on the buttercream.

Vanilla Buttercream

In a stand mixer or a large mixing bowl, beat butter for approximately 2 minutes or until light and fluffy. Gradually begin adding in the powdered sugar and continue mixing. Add in the vanilla extract and a pinch of salt. Stream in half of your heavy cream (or milk). If the buttercream appears to thick to spread, add in the remaining half of the heavy cream (or milk).

Cake Assembly

Level your cake layers with a serrated knife.

To a cake stand or large plate, spread a thin layer of buttercream frosting.

Place one of the cake layers onto the stand. Spread a thin layer of buttercream frosting. Remove your sugar cookie dough filling layer from the refrigerator and place on top. Spread another thin layer of buttercream frosting.

Place your other cake layer on top, flipping this cake layer upside down so that the top of your cake has a flat bottom. Press down gently.

Cover the entire cake with a layer of buttercream frosting. Smooth out the sides as much as possible. This will be your crumb coat. Chill the cake for 15-20 minutes before using the remaining buttercream to completely cover and frost the cake.

Add sprinkles to the top of the cake (as shown in picture). Using remaining buttercream, add to a pastry bag and pipe a design around the top of the cake.

This cake should serve approximately twelve people and is best enjoyed the day it is made. Store in an airtight container if leftovers remain.

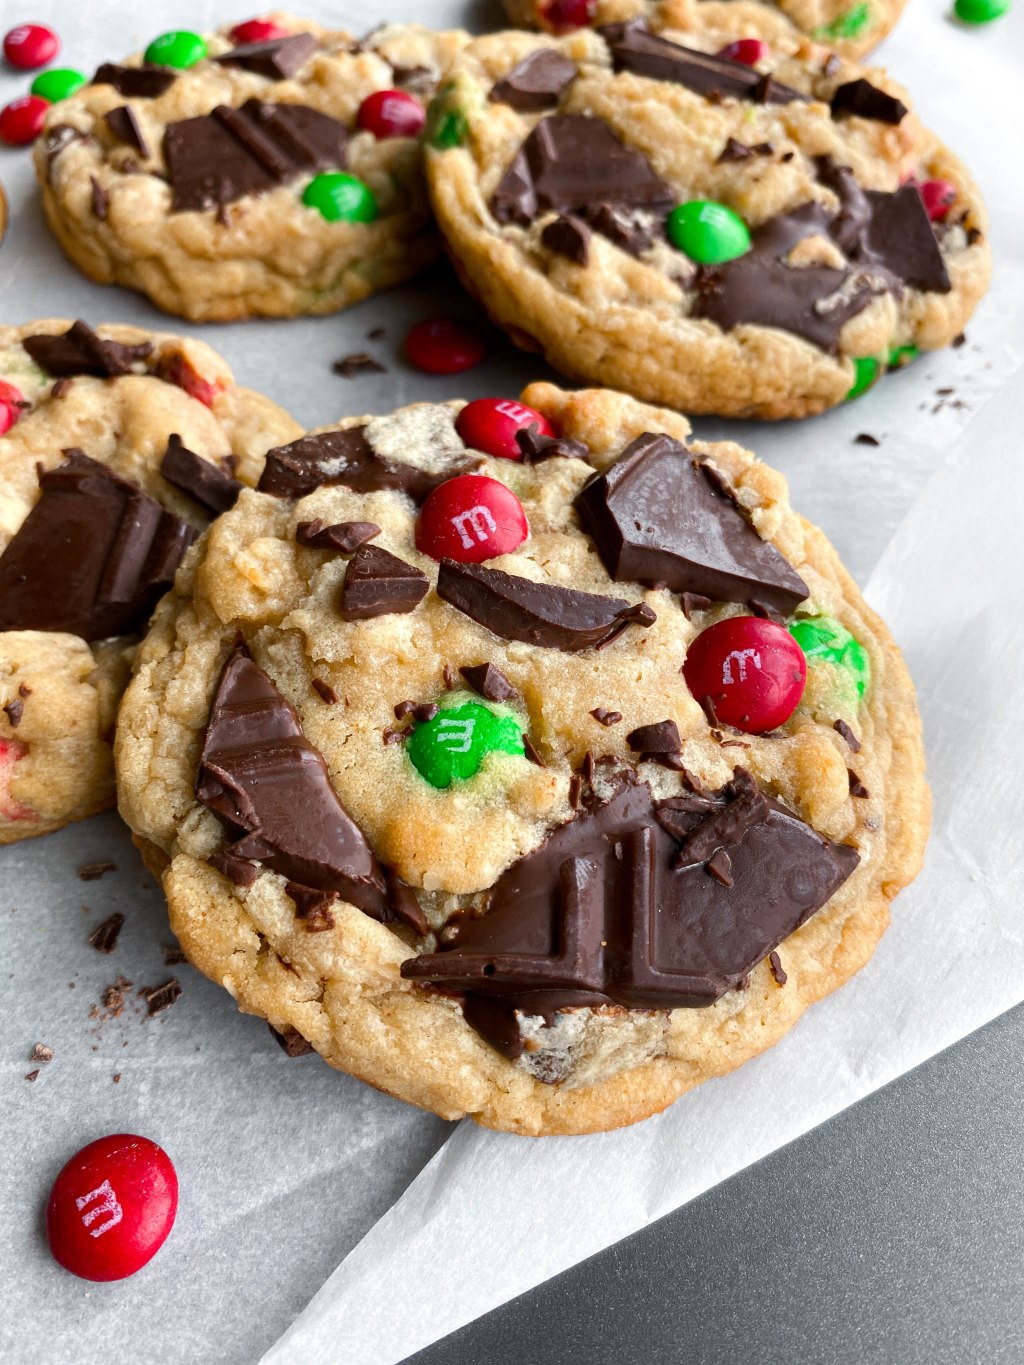
Soft Dark Chocolate Chunk Oatmeal Holiday Cookies

Serves 11 Large or 22 Regular Sized Cookies

Total Time 1 hour 30 Minutes

Ingredients

  • 1 cup unsalted butter, room temperature
  • 1 cup light brown sugar, packed
  • 1 / 2 cup granulated sugar
  • 2 eggs
  • 1 teaspoon vanilla extract
  • 2 1/2 cups all-purpose flour
  • 1 cup oats (rolled for a chewier texture or quick-oats for a softer texture)
  • 1 teaspoon baking soda
  • 1 teaspoon salt
  • 1 cup holiday m&m candies
  • 1 cup dark chocolate chunks

Preparation

Preheat oven to 375 degrees Fahrenheit. Line two large baking sheets with parchment paper. Set aside.

In a stand mixer or large mixing bowl, cream together butter, brown sugar and granulated sugar (approximately 3-4 minutes or until creamy). Add in the eggs one at a time, mixing to incorporate after each addition. Add in vanilla extract and mix. Set aside bowl.

In a medium mixing bowl, whisk together all-purpose flour, oats, baking soda and salt. Add this dry ingredient mixture to your large mixing bowl. Stir to combine. It should come together as a thick dough. Pour in the m&m candies and dark chocolate chunks and combine.

Cover the dough and place into the refrigerator to chill for at least 1 hour. Do not skip this step. Chilling allows for flavor development and will prevent overspreading while baking.

To make large cookies: use a 1 / 2 cup measuring cup to portion and form dough into 11 large dough portions. To make regular size cookies: use a 1 / 4 cup measuring cup and form 22 dough portions. Place dough onto your parchment lined baking sheets, leaving at least 2 inches in between each cookie.

Bake cookies 9-10 minutes for large sized cookies or 8-9 minutes for regular sized cookies. A lighter colored baking sheet will likely require the longer bake time while a darker colored baking sheet will likely require the shorter bake time. Remove from the oven when the bottoms appear golden brown and the middle appears soft.

Let the cookies cool and completely set up on the baking sheet for at least 10 minutes.

Store in a closed container for up to three days. Enjoy!

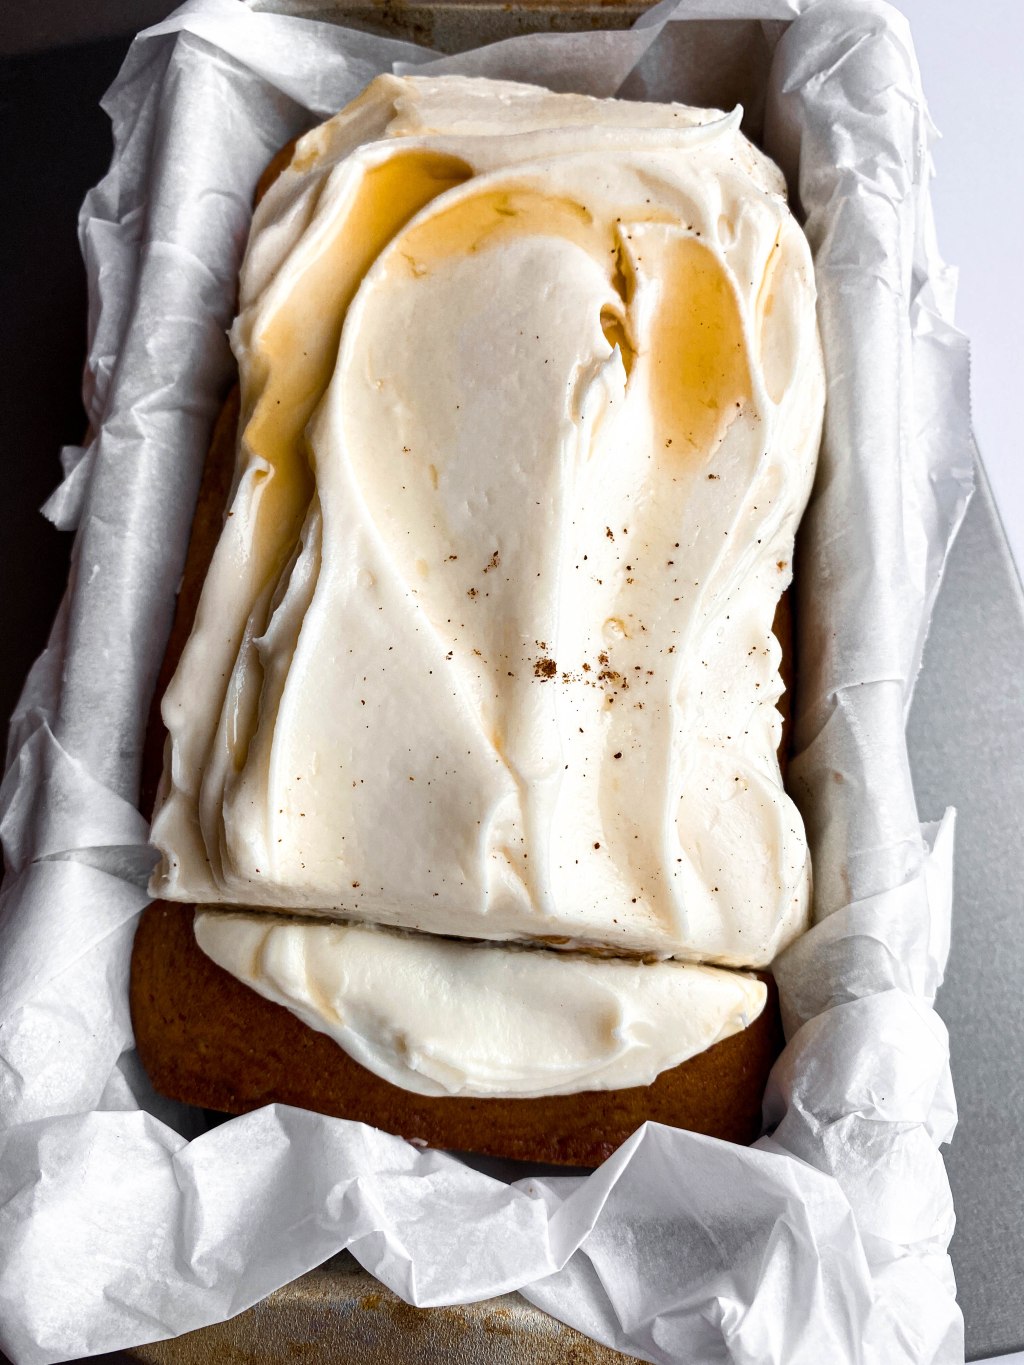
Spiced Apple Bread with a Simple Cream Cheese Frosting

Serves 8-10 Slices (Approximately)

Total Time 1 Hour 20 Minutes

Ingredients

  • Apple Bread
    • 2 cups all-purpose flour
    • 1 1/2 teaspoons baking powder
    • 2 teaspoons ground cinnamon
    • 1 / 2 teaspoon ground nutmeg
    • 1 / 2 teaspoon salt
    • 1 / 2 cup unsalted butter, room temperature
    • 3 / 4 cup granulated sugar
    • 2 eggs
    • 1 1/2 teaspoons vanilla extract
    • 1 / 2 cup milk
    • 1 large apple (granny smith), diced
  • Cream Cheese Frosting
    • 2 ounces cream cheese
    • 4 tablespoons unsalted butter, room temperature
    • 2 cups powdered sugar
    • 1 teaspoon vanilla extract
    • 1-2 tablespoons milk or heavy cream (until desired consistency is reached)

Preparation

Preheat the oven to 350 degrees Fahrenheit and line an 8 x 4 inch (or 9 x 5) loaf pan with parchment paper. Set aside.

In a stand mixer or large mixing bowl, cream the butter with the granulated sugar for 3-4 minutes, or until light and creamy. Turn the mixer down to the lowest speed and add in the eggs one at a time. Add in the vanilla extract.

In a separate mixing bowl, combine the all-purpose flour, baking powder, cinnamon, nutmeg, and salt.

Starting with your dry ingredient mixture, begin alternating additions of dry ingredients and the milk to the stand mixer or large mixing bowl. You should begin by adding 1/3 of your dry ingredient mixture and follow by adding 1/2 of your milk mixture. Repeat these additions, mixing after each until just incorporated. Add in your apple pieces and stir to combine.

Add batter to your lined loaf pan. Place in the oven and bake for 55 – 65 minutes, checking for doneness with a toothpick.

Once the bread is finished baking, prepare the cream cheese frosting. To a stand mixer or mixing bowl, add the cream cheese and butter. Mix for approximately 2-3 minutes, until it is light and creamy. Turn the mixer to the lowest speed and gradually add in the powdered sugar. Add in the vanilla extract. If the frosting is thicker than desired, stream in a tablespoon at a time of milk or heavy cream until desired consistency is reached.

Spread the cream cheese frosting over the top of the loaf once it has cooled completely.

Store in a closed container for 3-4 days. Enjoy!

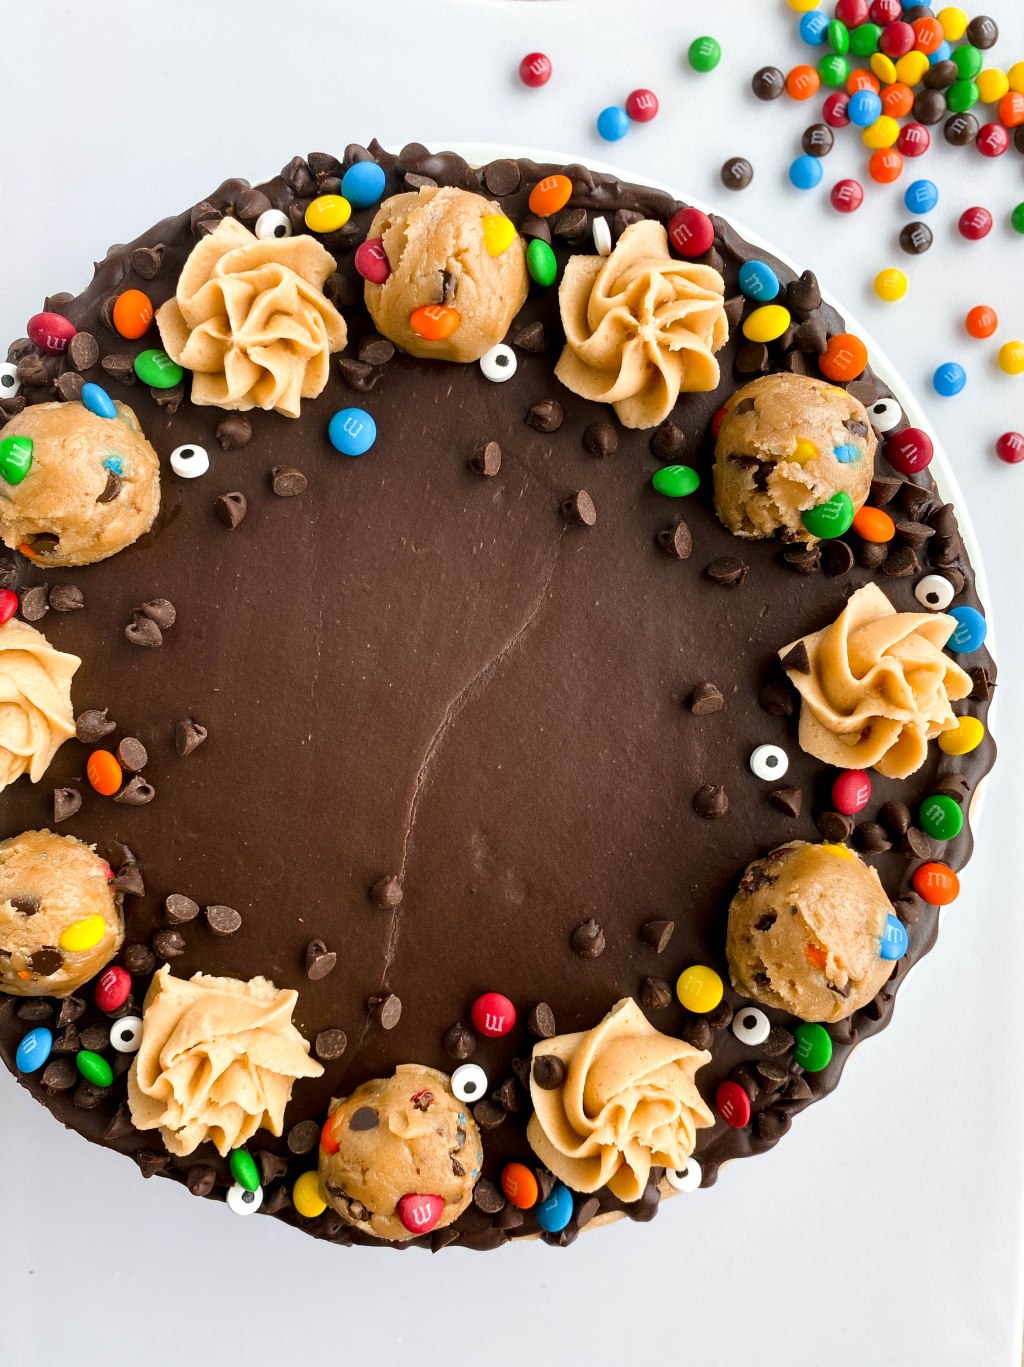
The Most Fun Chocolate Layered Cake with Edible Monster Cookie Dough

Serves 12 (approximately)

Total Time 2 Hours

Ingredients

  • Chocolate Cake
    • 1 3/4 cups cake flour (substitute all-purpose flour)
    • 3 / 4 cup Dutch-processed cocoa powder
    • 2 teaspoons baking powder
    • 1 / 4 teaspoon baking soda
    • 1 teaspoon salt
    • 3 / 4 cup unsalted butter, room temperature
    • 1 3/4 cups granulated sugar
    • 3 eggs, room temperature
    • 1 / 2 cup milk, room temperature
    • 1 / 2 cup sour cream, room temperature
  • Edible Monster Cookie Dough Filling
    • 1 1/4 cups all-purpose flour
    • 1 / 4 cup quick oats
    • 1 / 2 teaspoon salt
    • 1 / 4 cup unsalted butter, room temperature
    • 1 / 4 cup creamy peanut butter
    • 1 / 2 cup light brown sugar
    • 1 / 4 cup granulated sugar
    • 1 teaspoon vanilla extract
    • 1 / 4 cup milk
    • 1 / 4 cup mini chocolate chips
    • 1 / 4 cup mini M&M candies
  • Peanut Butter Buttercream
    • 1 1/2 cups creamy peanut butter
    • 1 cup unsalted butter (soft, but slightly cooler than room temperature)
    • 6 cups powdered sugar
    • 1 / 2 cup heavy cream (substitute with milk)
  • Chocolate Ganache
    • 3 / 4 cup semi-sweet chocolate chips
    • 3 tablespoons heavy cream (substitute milk)
  • For Decorating (optional)
    • mini chocolate chips
    • mini M&M candies
    • candy googly eyes

Preparation

Chocolate Cake

Preheat oven to 350 degrees. Trace and cut out parchment paper to line the bottoms of two 8 – inch cake pans. Set aside.

In a stand mixer or large mixing bowl, cream your butter for 2 minutes until light in color and fluffy. Add granulated sugar and mix for approximately 3-4 minutes or until creamy. Add in eggs, one at a time, incorporating after each addition. Set aside.

In a medium mixing bowl, whisk together flour, cocoa powder, baking powder, baking soda, and salt.

Whisk together your milk and sour cream. It is easiest to use a liquid measuring cup for this.

Starting with your dry ingredient mixture, begin alternating additions of dry ingredients and the milk mixture to the large mixing bowl. You should begin by adding 1/3 of your dry ingredient mixture and follow by adding 1/2 of your milk mixture. Repeat these additions, mixing after each until just incorporated. Avoid over mixing as this will result in a more dry finished cake.

Divide the cake batter equally between each of your cake pans. Place in the oven and bake for 25-35 minutes (a dark cake pan will requirer the shorter cook time while a lighter colored cake pan will require the longer cook time) or until an inserted toothpick comes out clean.

Remove the cakes from the cake pans and place on a wire rack to let cool completely.

Edible Monster Cookie Dough Filling

Spread the flour on a baking sheet in an even layer and place in the oven for 5 minutes at 350 degrees. This ensures that the raw flour will be safe to consume. Let cool completely before using. If the flour is not cooled, the chocolate chips will melt when added.

In a stand mixer or medium sized mixing bowl, cream together the butter, peanut butter, brown sugar and granulated sugar until light in color and creamy. Add in vanilla extract and mix again.

In a separate bowl, whisk together your flour, quick oats and salt (Note: Do not used rolled oats here as they will result in off-texture. Omit oats entirely if you do not have quick oats). Add to your creamed butter/sugar mixture. Mix to combine.

Pour in milk and combine. Fold in mini chocolate chips and M&M candies.

Line a third 8 – inch cake pan with plastic wrap or parchment paper. It should be thick, but as evenly as possible, spread 2 cups of the filling into a layer across the entire pan. Reserve some of the cookie dough for decorating the top of the cake if desired. Place this in the refrigerator to chill while you wait for the cake layers to cool and while you begin working on the buttercream.

Peanut Butter Buttercream

In a stand mixer or a large mixing bowl, beat butter for approximately 2 minutes or until smooth, light and fluffy. Add in the peanut butter and mix for an additional minute. Gradually begin adding in the powdered sugar and continue mixing. Stream in half of your heavy cream (or milk). If the buttercream appears to thick to spread, add in the remaining half of the heavy cream (or milk).

Chocolate Ganache

Add your chocolate chips to a small bowl. Heat your heavy cream on the stovetop or in the microwave until hot and steaming (not boiling). Pour the heavy cream over the top of the chocolate chips in the bowl. Let this sit for 3-4 minutes, then starting from the center of the bowl, begin stirring the mixture. The chocolate chips should melt and form a smooth chocolate ganache. Set this aside for assembly.

Cake Assembly

Level your cakes with a serrated knife to create flat, even layers that will be easy to stack.

To a cake stand or large plate, spread a thin layer of buttercream frosting.

Place one of the cake layers onto the stand. Spread a thin layer (approximately 1/4″ thick) of buttercream frosting. Remove your monster cookie dough filling layer from the refrigerator and place on top. Spread another thin layer of buttercream frosting.

Place your other cake layer on top, flipping this cake layer upside down so that the top of your cake has a flat bottom. Press down gently.

Cover the entire cake with a layer of buttercream frosting. Smooth out the sides as much as possible. This will be your crumb coat. Chill the cake for 10-15 minutes before using the remaining buttercream to completely cover and frost the cake.

Spread an even layer of chocolate ganache over the top of the cake. Use a spoon or squeeze bottle filled with chocolate ganache to create drips down the side of the cake.

Add any remaining buttercream to a pastry bag and pipe designs around the top of the cake. Roll the reserved monster cookie dough into balls and add around the top. Use mini chocolate chips and M&M candies to create a ring around the top as well. It is easiest to reference the photo here.

This cake should serve approximately twelve people and is best enjoyed the day it is made! Store in an airtight container if leftovers remain.

Funfetti Layered Cake with Edible Sugar Cookie Dough Filling and Vanilla Buttercream

Serves 12 Slices (Approximately)

Total Time 2 Hours

Ingredients

  • Funfetti Cake
    • 2 1/2 cups cake flour
    • 2 teaspoons baking powder
    • 1 / 4 teaspoon baking soda
    • 1 / 2 teaspoon salt
    • 3 / 4 cup unsalted butter, room temperature
    • 1 1/2 cups granulated sugar
    • 3 eggs, room temperature
    • 2 1/2 teaspoons vanilla extract
    • 1 / 2 cup milk, room temperature
    • 1 / 2 cup sour cream, room temperature
    • 1 cup sprinkles of choice
  • Sugar Cookie Dough Filling
    • 2 cups all-purpose flour
    • 1 / 2 teaspoon salt
    • 1 cup unsalted butter, room temperature
    • 2 / 3 cup granulated sugar
    • 1 1/2 teaspoons vanilla extract
    • 2 tablespoons milk
    • 1 / 4 cup sprinkles of choice
  • Vanilla Buttercream
    • 1 1/2 cups unsalted butter (soft, but slightly cooler than room temperature)
    • 4 cups powdered sugar
    • 1 1/2 teaspoons vanilla extract
    • 1 / 4 cup heavy cream (substitute with milk)
    • pinch of salt
  • For Decorating
    • sprinkles of choice

Preparation

Funfetti Cake

Preheat oven to 350 degrees. Trace and cut out parchment paper to line the bottoms of two 8 – inch cake pans. Set aside.

In a stand mixer or large mixing bowl, cream your butter for 2 minutes until light in color and fluffy. Add granulated sugar and mix for approximately 3-4 minutes or until creamy. Add in eggs, one at a time, incorporating after each addition. Add in vanilla extract. Set aside.

In a medium mixing bowl, whisk together cake flour, baking powder, baking soda, and salt.

Whisk together your milk and sour cream. It is easiest to use a liquid measuring cup for this.

Starting with your dry ingredient mixture, begin alternating additions of dry ingredients and the milk mixture to the large mixing bowl. You should begin by adding 1/3 of your dry ingredient mixture and follow by adding 1/2 of your milk mixture. Repeat these additions, mixing after each until just incorporated. Avoid over mixing.

Add in your sprinkles of choice and mix until just combined.

Divide the cake batter equally between each of your cake pans. Place in the oven and bake for 25-35 minutes (a dark cake pan will requirer the shorter cook time while a lighter colored cake pan will require the longer cook time) or until an inserted toothpick comes out clean.

Remove the cakes from the cake pans and place on a wire rack to let cool completely.

Sugar Cookie Dough Filling

Spread the flour on a baking sheet in an even layer and place in the oven for 5 minutes at 350 degrees. This ensures that the raw flour will be safe to consume. Let cool completely before using.

In a medium sized mixing bowl, use a mixer to cream the butter with the granulated sugar until it is light in color and creamy. Add in vanilla extract and mix again.

In a separate bowl, whisk together your flour and salt. Add to your creamed butter/sugar mixture. Mix to combine.

Pour in milk and stir to combine. Fold in sprinkles of choice.

Line a third 8 – inch cake pan with plastic wrap or parchment paper. It should be thick, but as evenly as possible, spread the filling into a layer across the entire pan. Place this in the refrigerator to chill while you wait for the cake layers to cool and while you begin working on the buttercream.

Vanilla Buttercream

In a stand mixer or a large mixing bowl, beat butter for approximately 2 minutes or until light and fluffy. Gradually begin adding in the powdered sugar and continue mixing. Add in the vanilla extract and a pinch of salt. Stream in half of your heavy cream (or milk). If the buttercream appears to thick to spread, add in the remaining half of the heavy cream (or milk).

Cake Assembly

To a cake stand or large plate, spread a thin layer of buttercream frosting.

Place one of the cake layers onto the stand. Spread a thin layer of buttercream frosting. Remove your sugar cookie dough filling layer from the refrigerator and place on top. Spread another thin layer of buttercream frosting.

Place your other cake layer on top, flipping this cake layer upside down so that the top of your cake has a flat bottom. Press down gently.

Cover the entire cake with a layer of buttercream frosting. Smooth out the sides as much as possible. This will be your crumb coat. Chill the cake for 15-20 minutes before using the remaining buttercream to completely cover and frost the cake.

Add a ring of sprinkles to the top of the cake (as shown in picture). If you have remaining buttercream, add to a pastry bag and pipe a design around the top of the cake.

This cake should serve approximately twelve people and is best enjoyed the day it is made. Store in an airtight container if leftovers remain.

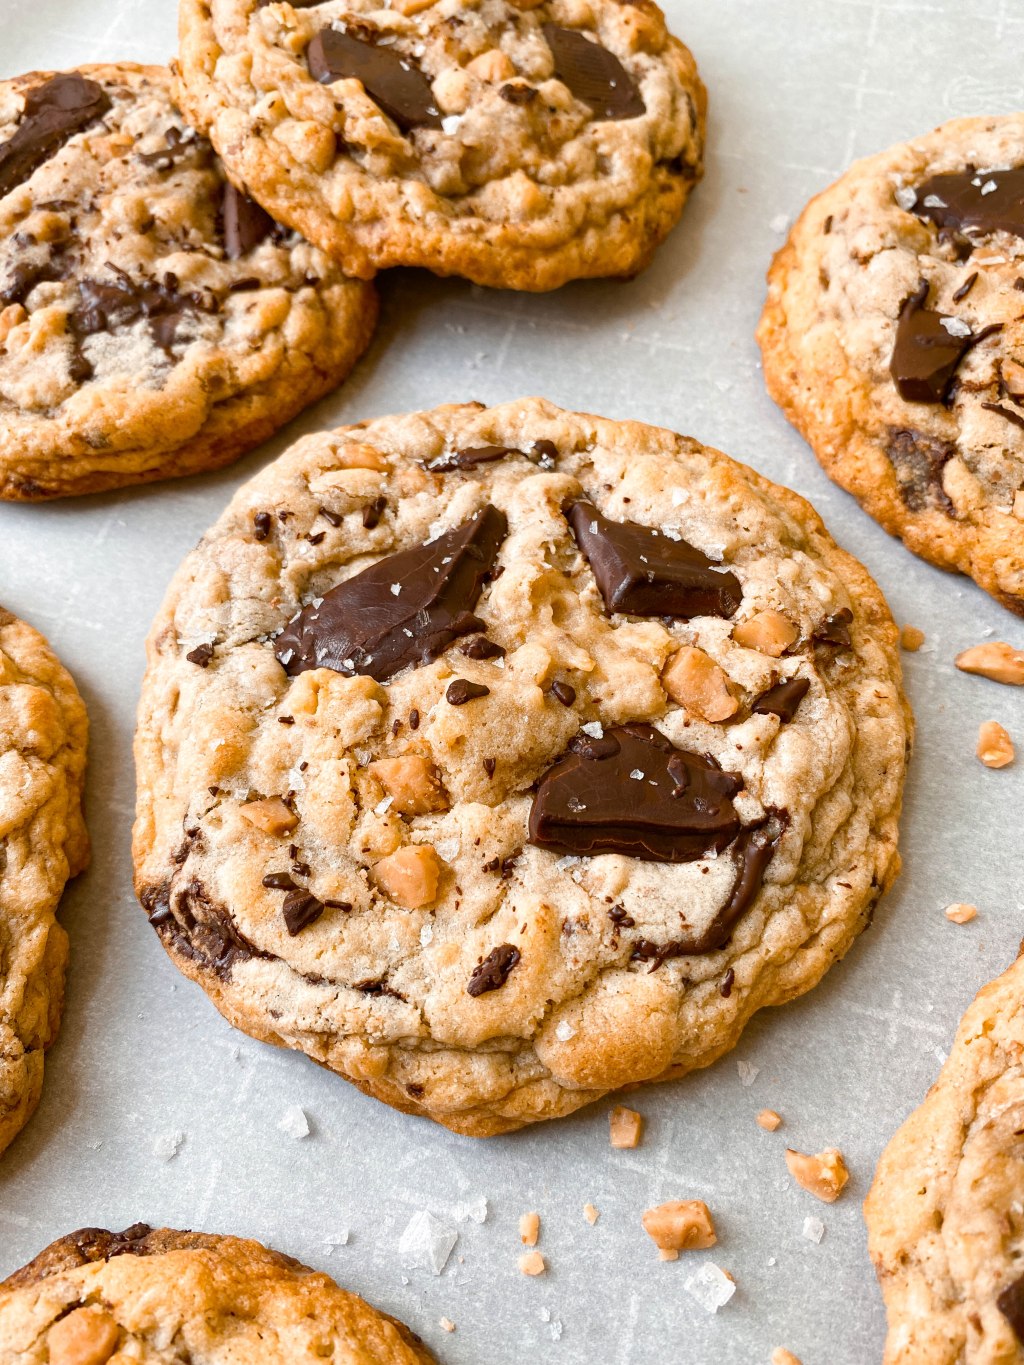
Salted Toffee and Dark Chocolate Chunk Oatmeal Cookies

Serves 11 Large Cookies or 22 Regular Cookies

Total Time Less Than One Hour

Ingredients

  • 1 cup unsalted butter, room temperature
  • 1 cup light brown sugar, packed
  • 1 / 2 cup granulated sugar
  • 2 eggs
  • 1 teaspoon vanilla extract
  • 2 1/2 cups all-purpose flour
  • 1 cup oats (rolled oats for a chewier texture or quick oats for a softer texture)
  • 1 teaspoon baking soda
  • 1 teaspoon salt
  • 1 cup dark chocolate chunks (or chocolate chips)
  • 1 cup toffee pieces
  • optional: flakey sea salt to finish

Preparation

Preheat oven to 375 degrees Fahrenheit. Line two large baking sheets with parchment paper. Set aside.

In a large mixing bowl, use a mixer to cream together butter, brown sugar and granulated sugar (approximately 3-4 minutes, scraping the sides of the bowl and beater after the first 2 minutes). Add in the eggs one at a time, mixing to incorporate after each addition. Add in vanilla extract and mix. Set aside bowl.

In a medium mixing bowl, whisk together all-purpose flour, oats, baking soda and salt. Add this dry ingredient mixture to the other large mixing bowl. Stir to combine or use the paddle attachment on your mixer. It should come together as a thick dough. Pour in the chocolate chunks and toffee pieces and combine.

Place the dough into the refrigerator to chill for 30 minutes. Do not skip this step. Not properly chilling the dough will result in over spreading and oily cookies.

Use a 1 / 2 cup measuring cup to form dough into 11 large dough portions. If you would prefer regular sized cookies, use a 1 / 4 cup measuring cup and form 22 dough portions. Place dough onto your parchment lined baking sheets, leaving at least 2 inches in between each cookie.

Bake for 10-11 minutes for large sized cookies or 9-10 minutes for smaller sized cookies. A lighter colored baking sheet will likely require the longer bake time while a darker colored baking sheet will likely require the shorter bake time. Remove from the oven when the bottoms appear to be golden brown but the middle still appears soft. Let the cookies completely cool and set up on the baking sheet for at least 10 minutes. Finish with flakey sea salt if desired.

Store in a closed container for up to three days. Enjoy!

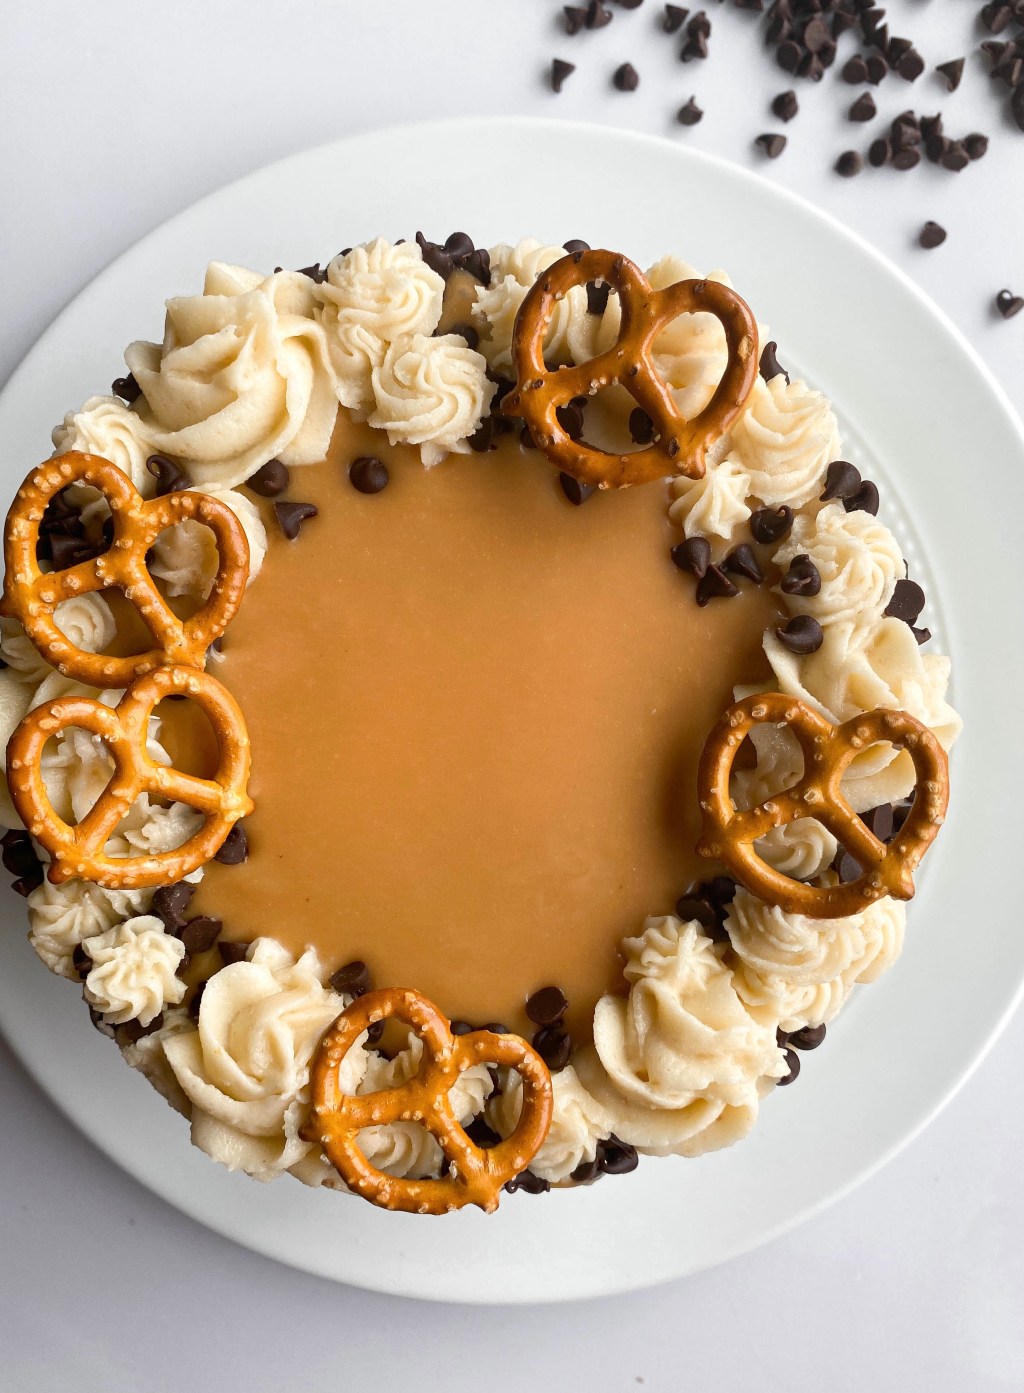
“Everything But The Kitchen Sink Cookie” Layered Cake

Serves 12 Slices (Approximately)

Total Time 2 Hours

Ingredients

  • Chocolate Chip Cake
    • 2 1/2 cups cake flour
    • 2 teaspoons baking powder
    • 1 / 4 teaspoon baking soda
    • 1 / 2 teaspoon salt
    • 3 / 4 cup unsalted butter, room temperature
    • 1 1/2 cups granulated sugar
    • 3 eggs, room temperature
    • 2 teaspoons vanilla extract
    • 1 / 2 cup milk, room temperature
    • 1 / 2 cup sour cream, room temperature
    • 1 cup mini chocolate chips (coated with 1 teaspoon of additional flour)
  • Caramel Sauce
    • 20 unwrapped square caramel candies (155 grams or approximately 3 / 4 cup)
    • 1 / 3 cup heavy cream
    • pinch of salt
  • Pretzel Cream Cheese Frosting
    • 2 cups pretzels (using 1/2 cup of fine pretzel crumbs)
    • 16 oz (2 standard sized packs) cream cheese, room temperature
    • 1 cup unsalted butter, slightly cooler than room temperature
    • 8 cups (or a 2-pound bag) powdered sugar
    • 1 teaspoon vanilla extract
    • pinch of salt
  • For Decorating (Optional)
    • 1 / 2 cup chocolate chips
    • 2 tablespoons milk
    • Pretzels
    • Chocolate sprinkles

Preparation

Chocolate Chip Cake

Preheat oven to 350 degrees. Trace and cut out parchment paper to line the bottoms of two 8 – inch cake pans or three 6 – inch cake pans. Set aside.

In a large mixing bowl, use a mixer to cream butter for 2 minutes until light in color and fluffy. Add granulated sugar and mix for approximately 3-4 minutes or until creamy. Add in eggs, one at a time, incorporating after each addition. Add in vanilla extract. Set aside.

In a medium mixing bowl, whisk together cake flour, baking powder, baking soda and salt.

In a glass measuring cup, whisk together your milk and sour cream.

Starting with your dry ingredient mixture, begin alternating additions of dry ingredients and the milk/sour cream to the large mixing bowl. You should begin by adding 1/3 of your dry ingredient mixture and follow by adding 1/2 of your milk. Repeat these additions, mixing after each until just incorporated. Avoid over mixing as this will cause the cake to become dry when baked.

Toss one cup of mini chocolate chips with 1 teaspoon of cake flour. Be sure to coat each chocolate chip with flour. This will prevent the chocolate chips from sinking in the cake batter while baking.

Add in the chocolate chips to your batter and mix until just incorporated.

Divide the cake batter equally between each of your cake pans. Place in the oven and bake for 25-35 minutes (a dark cake pan will requirer the shorter cook time while a lighter colored cake pan will require the longer cook time) or until an inserted toothpick comes out clean.

Remove the cakes from the cake pans and place on a wire rack to let cool completely.

Pretzel Cream Cheese Frosting

To a high speed blender, add approximately 2 cups of pretzels. Blend until the majority of the pretzels are fine crumbs and no large pieces remain. Use a fine mesh sifter to sift the pretzels, then measure 1/2 cup of the fine crumbs to use for the frosting. Set aside the 1/2 cup and reserve the remaining pretzel mixture for decorating the cake.

In a large mixing bowl or in a standard mixer, beat the cream cheese and butter until light and fluffy (approximately 2 minutes). Add in vanilla extract and a pinch of salt. Gradually begin to add in powdered sugar and continue to mix. Add in the 1/2 cup of fine pretzel crumbs. If the frosting appears to thick to spread, slowly add in milk a tablespoon at a time until desired consistency is reached.

Caramel Sauce

In a small saucepan over medium heat, begin to melt the unwrapped caramel candies. Heat for approximately a minute, stirring constantly and scraping the bottom and sides of the pan to prevent burning. The candies will likely clump together.

After a minute, pour the heavy cream into your saucepan. Continue stirring until the caramels melt completely and the mixture is smooth. Remove from heat. Add in a large pinch of salt and set aside to cool completely, stirring occasionally to keep the caramel smooth.

Cake Assembly

To a cake stand or large plate, spread a thin layer of your cream cheese frosting.

Place one of the cake layers onto the stand. Spread a layer of cream cheese frosting about 1/2 inch thick.

Use a piping bag with a round tip to pip a 1/2 inch tall border around the edge of the frosting layer. This will create a border so the caramel sauce layer will not spill out over the edges of the cake when added.

To the middle of the frosting layer, pour in a layer of caramel sauce. Do not pour in more than can be contained within the pipped border. Carefully spread it out into an even layer.

Place the cake in the freezer or refrigerator to chill and set for 10-15 minutes before continuing assembly.

Place another cake layer on top, flipping this cake layer upside down so that the top of your cake has a flat bottom. Press down gently. (Note: If you are using three 6 – inch cake layers, then you will need to repeat the earlier process of adding a cream cheese frosting layer, pipping a border, and filling with caramel sauce before placing the final cake layer on top.)

Cover the entire cake with a thin layer of frosting to create a crumb coat. Smooth out the sides as much as possible. Chill the cake for about 20 minutes before using the remaining frosting to completely cover and frost the cake.

(Optional For Decorating) To the bottom edge of the cake, create a rim with the remaining pretzels crumbs and additional broken pretzel pieces. In a small microwavable bowl, combine chocolate chips with milk. Microwave in 20 second intervals, stirring after each interval, until the chocolate is completely melted and smooth. The consistency of the chocolate should be pourable. Spoon the chocolate onto the top of the cake and spread to cover. Create some drips down the sides of the cake using either a spoon or a squeeze bottle filled with the chocolate. Use any remaining cream cheese frosting to create dollops around the edge of the cake and press in additional pretzels as decoration. Add chocolate sprinkles if desired.

Let the chocolate topping completely set up before slicing. This cake should serve approximately 12 people. Enjoy!

Note: Cake is best enjoyed the day it is made. Pretzel pieces used for decorating will soften and lose their crunch with time. If leftovers remain, make sure to store in an air-tight container.

Easy Strawberry Blondies with Cream Cheese Icing
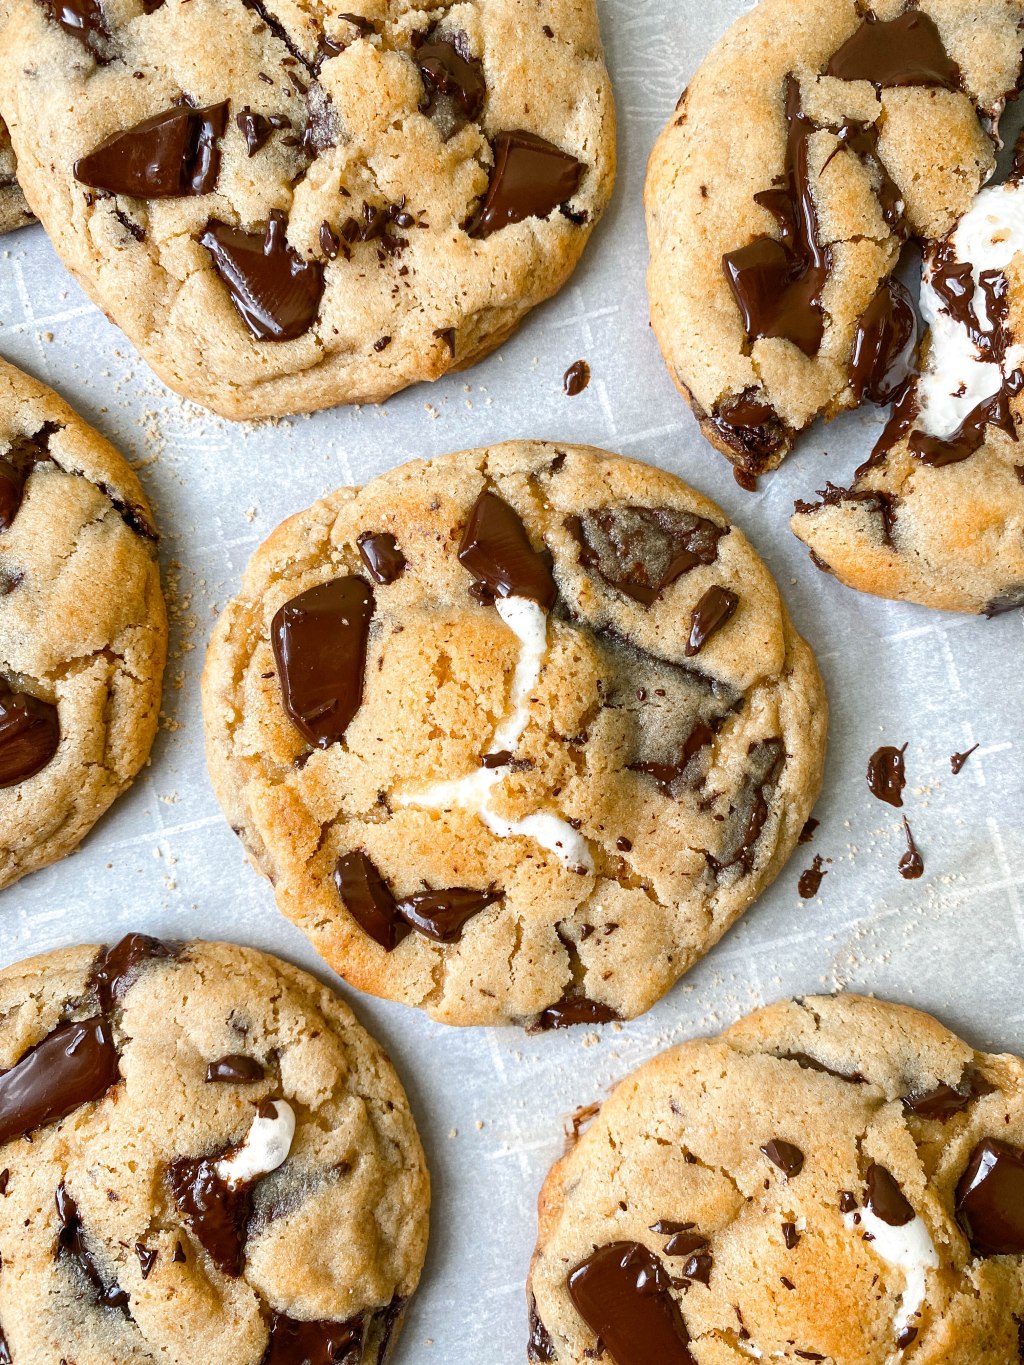
Serves 16 Small Bars (or 9 Large Bars)

Total Time One Hour

Ingredients

  • Blondies
    • 1 / 2 cup (8 tablespoons) unsalted butter
    • 1 cup light brown sugar, packed
    • 1 egg
    • 1 teaspoon vanilla extract
    • 1 cup all-purpose flour
    • 1 / 2 teaspoon salt
    • 1 / 2 cup strawberries, diced
    • 1 teaspoon cornstarch
  • Cream Cheese Icing
    • 2 ounces cream cheese
    • 2 cups powdered sugar
    • 2 tablespoons milk
    • 1 / 4 teaspoon vanilla extract
    • pinch of salt

Preparation

Blondies

Preheat your oven to 325 degrees Fahrenheit and line an 8 x 8 square baking pan with parchment paper.

In a large mixing bowl, whisk together flour and salt. Set aside.

In a small sauce pan, melt your butter over medium heat. Once melted, remove from heat and transfer to a medium sized mixing bowl. Add in the brown sugar. Stir to combine. Add in the vanilla extract and egg and combine again.

Add the wet ingredient mixture to your large mixing bowl of dry ingredients. Stir to combine completely.

Using a sharp knife, dice a half of a cup of strawberries. Remove excess moisture with a clean towel by gently blotting the strawberries on a work surface. Place into a small bowl then add your corn starch. Gently stir to distribute and completely cover the strawberries with the cornstarch. Pour the strawberries into your large mixing bowl and fold into the batter.

To your lined baking pan, pour in your batter.. Make sure the batter spreads out across the entire pan, reaching into the corners as well.

Place in the oven and bake for 25-30 minutes or until the edges are golden and the middle is set. Let cool completely in the pan.

Cream Cheese Icing

While the blondies are cooling, prepare your cream cheese icing. To a saucepan, add the cream cheese, powdered sugar, vanilla extract, milk and pinch of salt. Place over low heat on the stovetop, using a whisk to stir constantly. Stir until the cream cheese melts and no clumps of powdered sugar remain. Remove from heat and use either a spoon or a piping bag to ice the blondies. I choose to use a small amount of icing to create a pattern when making these, however, there is plenty of icing to completely cover the entire pan of blondies.

Enjoy!